CONTENTS
POKÉMON™ SWORD & SHIELD
[PRO]
........................................................................ 2
GAMEPACK OVERVIEW .......................................................................................... 2
PRO CONTROLLER WIRED COMMUNICATION: ON .............................................. 2
CONTROLLER CONVERSION TABLE ...................................................................... 3
RESET BUTTON MAPPING ................................................................................... 4
CONTROLLER VIBRATION .................................................................................... 5
GAMEPACK SETUP .............................................................................................. 6
SINGLE RELEASE ..................................................................................................... 9
BOX RELEASE ....................................................................................................... 10
SHINY EGG CHAINING .......................................................................................... 12
EGG FARMING (ADVANCED SHINY CHAINING) ..................................................... 16
BOX EGG HATCHING (ADVANCED SHINY CHAINING) ........................................... 19
MAX RAID WATT GENERATOR ............................................................................. 23
AUTO ROTO LOTO ................................................................................................ 25
BOX SURPRISE TRADE .......................................................................................... 28
EASY CYCLE .......................................................................................................... 31
AUTO SPIN ........................................................................................................... 32
AUTO INTERACT ................................................................................................... 33
EASY TURBO / HOLD ............................................................................................ 34
VIDEO PLAYLIST ................................................................................................... 36

Pg. 2/36
POKÉMON™ SWORD & SHIELD
[PRO]
CRONUS ZEN™
GAMEPACK OVERVIEW
The Cronus Zen™ Pokémon™ Sword & Shield
[PRO]
Game Pack will assist you with
farming items, Shiny Pokémon and more!
PRO CONTROLLER WIRED COMMUNICATION: ON
For the Pokémon™ MODS to function correctly, it is extremely important to
set “Pro Controller Wired Communication: On” in your Nintendo Switch™ System
Settings, under Controllers and Sensors.
Pg. 3/36
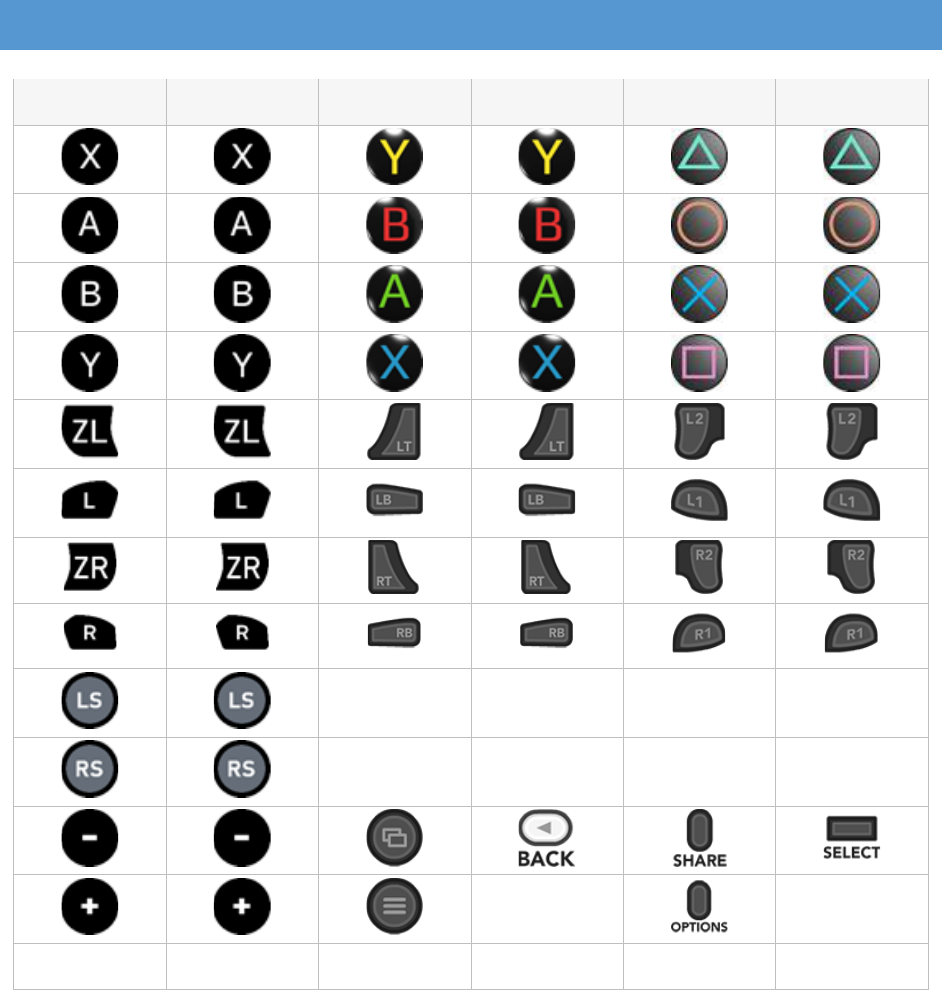
CONTROLLER CONVERSION TABLE
SW
WII
XB1
360
PS4
PS3
LS
LS
L3
L3
RS
RS
R3
R3
START
START
HOME
HOME
HOME
GUIDE
PS
PS
Pg. 4/36
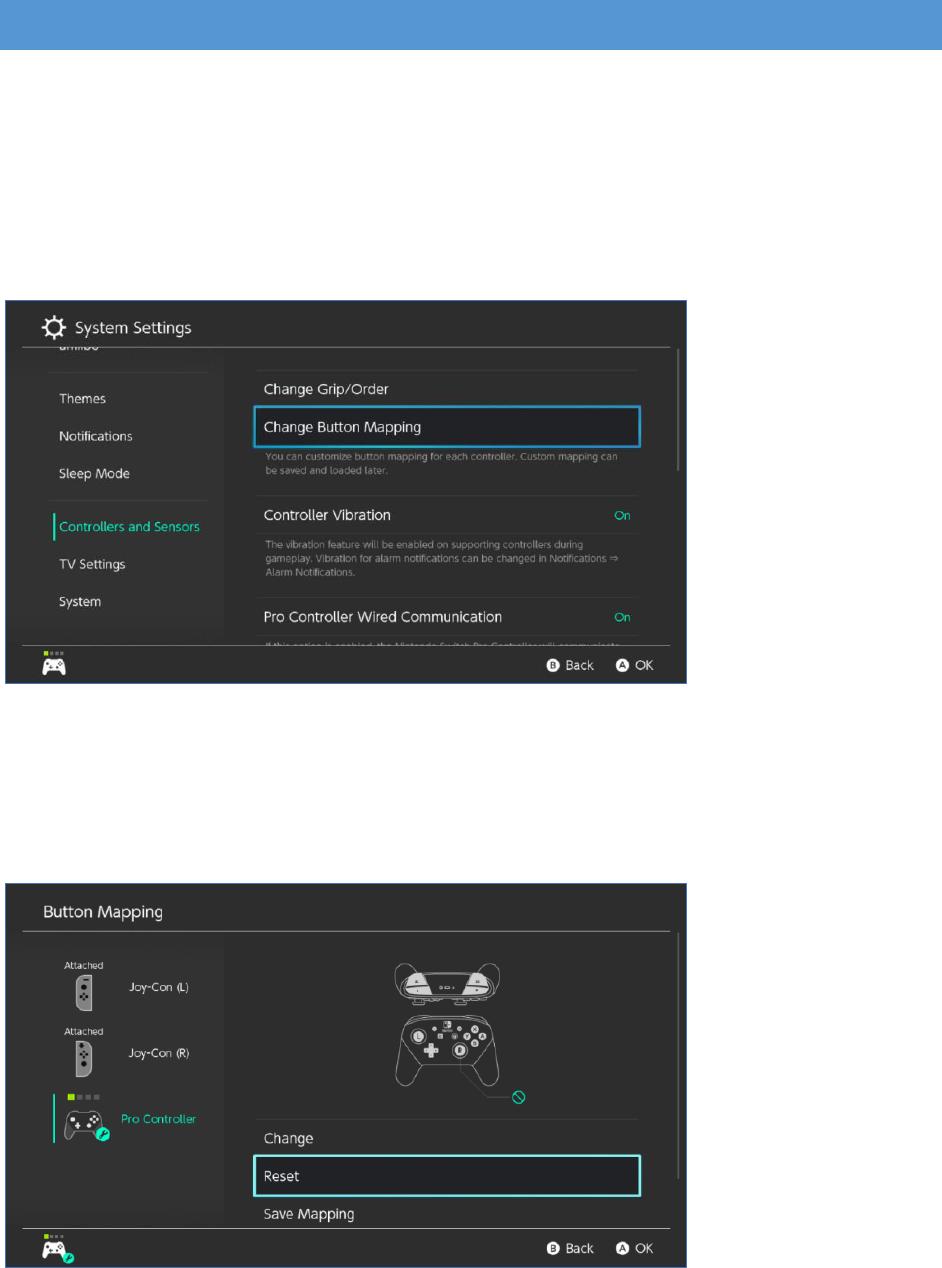
RESET BUTTON MAPPING
If they have been altered, it is important to RESET your Button Mappings from
the “Change Button Mapping” menu in your Nintendo Switch™ System
Settings, under Controllers and Sensors.
1. Navigate to System Settings and Controllers and Sensors.
2. Navigate to Change Button Mapping.
3. Select the Cronus Zen™ controller (it will show up as “Pro Controller”),
select Reset, press OK and confirm. Reset and Save Mapping should
be greyed out before you leave.

Pg. 5/36
CONTROLLER VIBRATION
Make sure that your Controller Vibration setting is set to ON.
Pg. 6/36
GAMEPACK SETUP
This section covers the initial Game Pack setup that is REQUIRED for MODS to
function correctly.
Gamepack Setup ★ Pokémon Sword & Shield [PRO] ★ Cronus Zen ☯ - https://youtu.be/RiMswFBSpao
To open the Game Pack Configuration
Menu on the OLED display, HOLD &
together until you feel a rumble. This
menu provides you with access to ALL
adjustable settings and MODS.
Navigate between settings using L and R and adjust with the D-PAD.
Listed options: use DOWN and UP.
Numeric values: use RIGHT and LEFT.
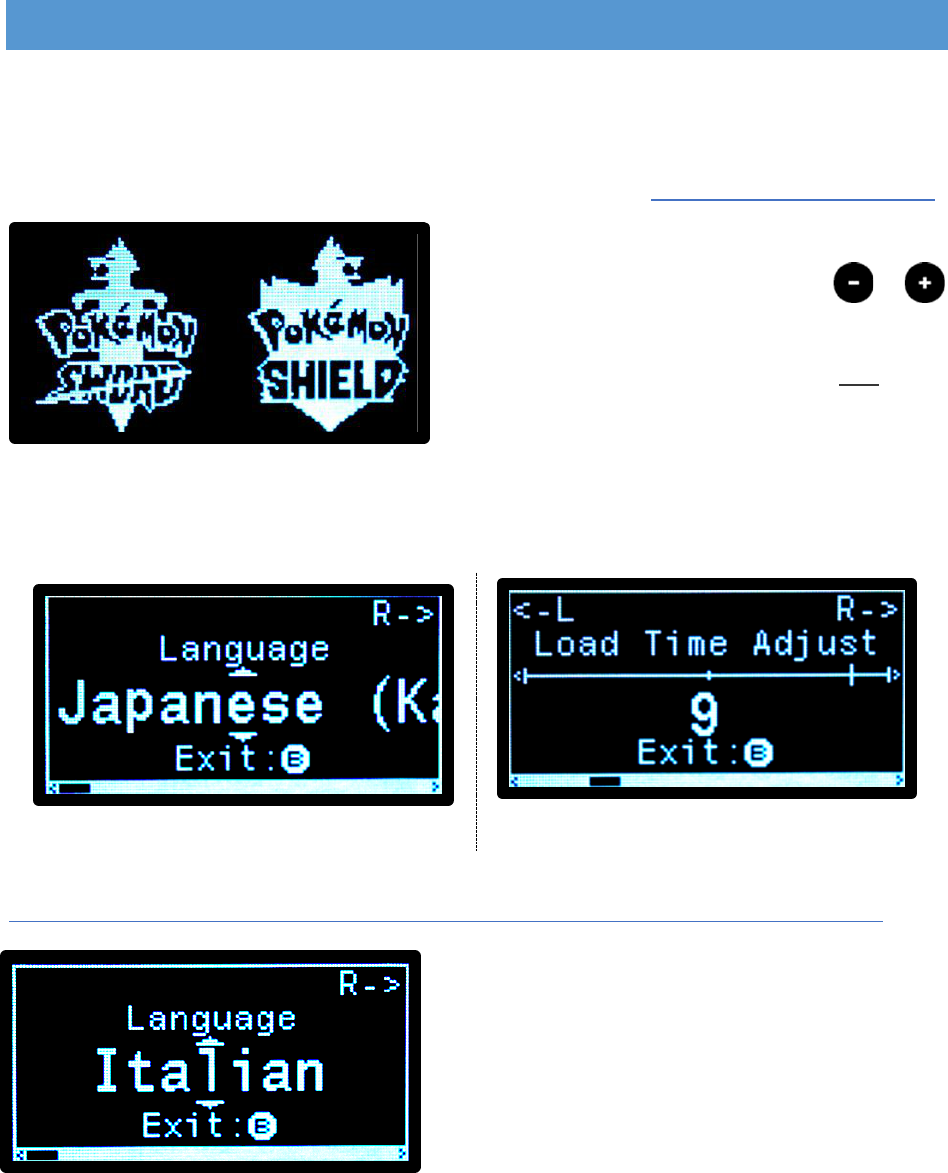
BEFORE USING THIS GAMEPACK, SET IT UP FOR YOUR IN-GAME LANGUAGE:
If your game is set to another language
other than English, you will need to choose
that language in the Game Pack
Configuration Menu. This is vital to ensure
the correct timing for ALL MODS.
Pg. 7/36
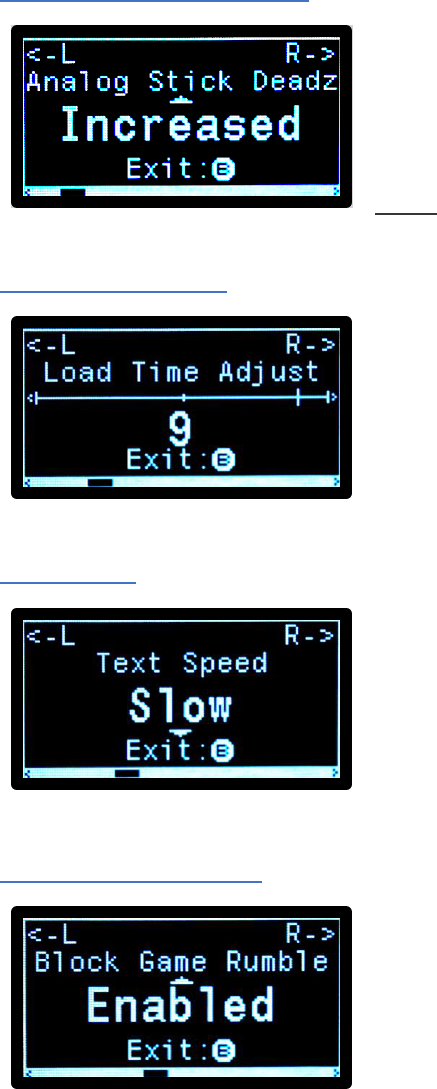
ANALOG STICK DEADZONE:
If your controller is prone to stick drift and your
character is moving by itself, you can set the
Analog Stick Deadzone to Increased. This makes
the analog sticks slightly less responsive, so
ONLY use it if needed.
LOAD TIME ADJUST:
Due to multiple factors, some Switch™ consoles
load slower than others. We have included the
Load Time Adjustable to account for this. If
MODS start losing sync, you should increase the
value.
TEXT SPEED:
This setting will be automatically updated when
one of the MODS changes your in-game Text
Speed.
BLOCK GAME RUMBLE:
Enabling this setting blocks the feeling of any in-
game controller rumbles in a MOD friendly way.

Pg. 8/36
SAVE CHANGES:
Now that everything has been set up, you can
exit the Game Pack Configuration Menu.
TAP until you see the Save Changes Screen.
While selecting Save, TAP .
You will see a prompt confirming that your settings have been saved. If you select
Don’t Save, you will not see a confirmation prompt, and your changes will be
reverted.
Pg. 9/36
SINGLE RELEASE
The Single Release MOD allows you to quickly release Pokémon™ one at a time
from your Box.
Gamepack Setup ★ Pokémon Sword & Shield [PRO] ★ Cronus Zen ☯ - https://youtu.be/RiMswFBSpao
STEP 1: SAVE BEFORE USING THIS MOD in case something goes wrong!
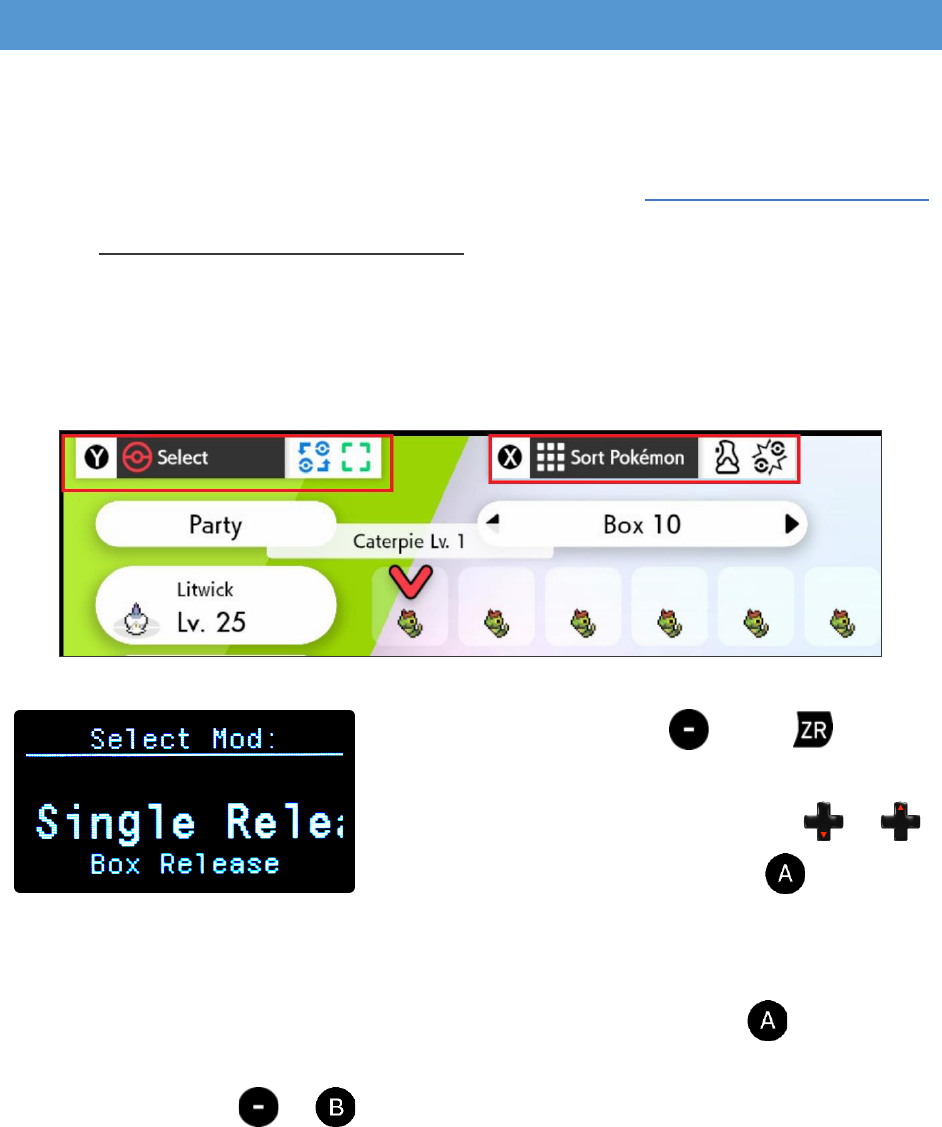
STEP 2: Go to your Box screen.
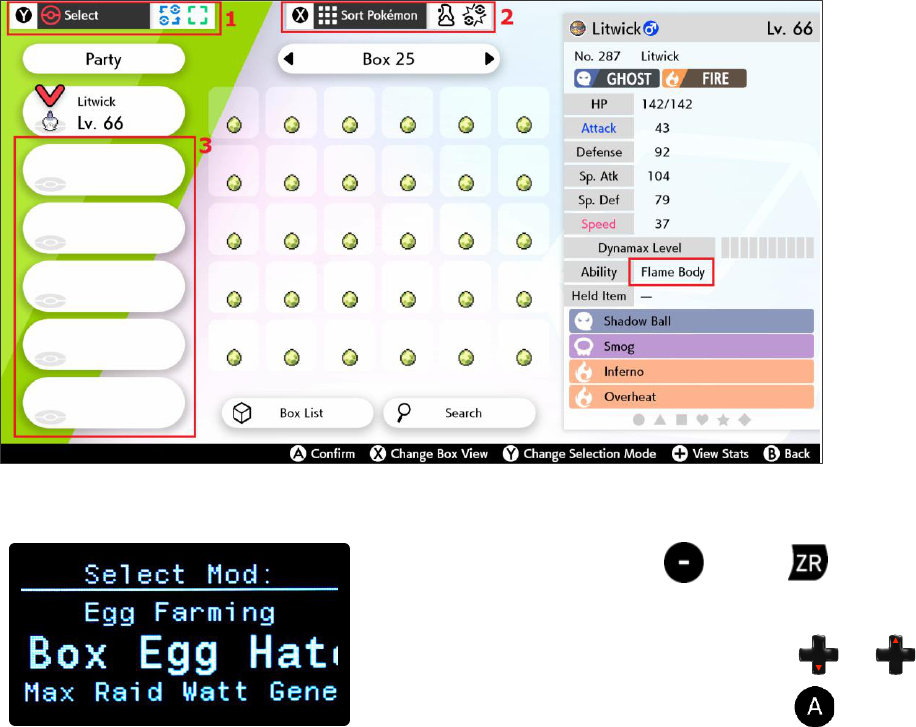
STEP 3: Make sure that your Selection Mode is set to “Select”, and your Box View
is set to “Sort Pokémon”.
STEP 4: WHILE HOLDING , HOLD until
you feel a rumble and the OLED display changes
to the MOD Selector. Navigate using or
to select Single Release, then TAP to
activate the MOD (Heavy Rumble).
STEP 5: Now when you select a Pokémon™ and press Confirm or , it will
quickly release it. If you decide to change your mind midway through releasing
the Pokémon™, TAP or to deactivate the MOD (Light Rumble).

Pg. 10/36
BOX RELEASE
The Box Release Pokémon MOD allows you to automatically release entire
boxes of Pokémon.
Gamepack Setup ★ Pokémon Sword & Shield [PRO] ★ Cronus Zen ☯ - https://youtu.be/RiMswFBSpao
STEP 1: SAVE BEFORE USING THIS MOD in case something goes wrong!
STEP 2: Go to your Box screen.
STEP 3: Make sure that your Selection Mode is set to “Select”, and your Box View
is set to “Sort Pokémon”.
STEP 4: Navigate to a box that is COMPLETELY FULL OF POKÉMON™ (NO EGGS)
THAT YOU WANT TO RELEASE.
Pg. 11/36
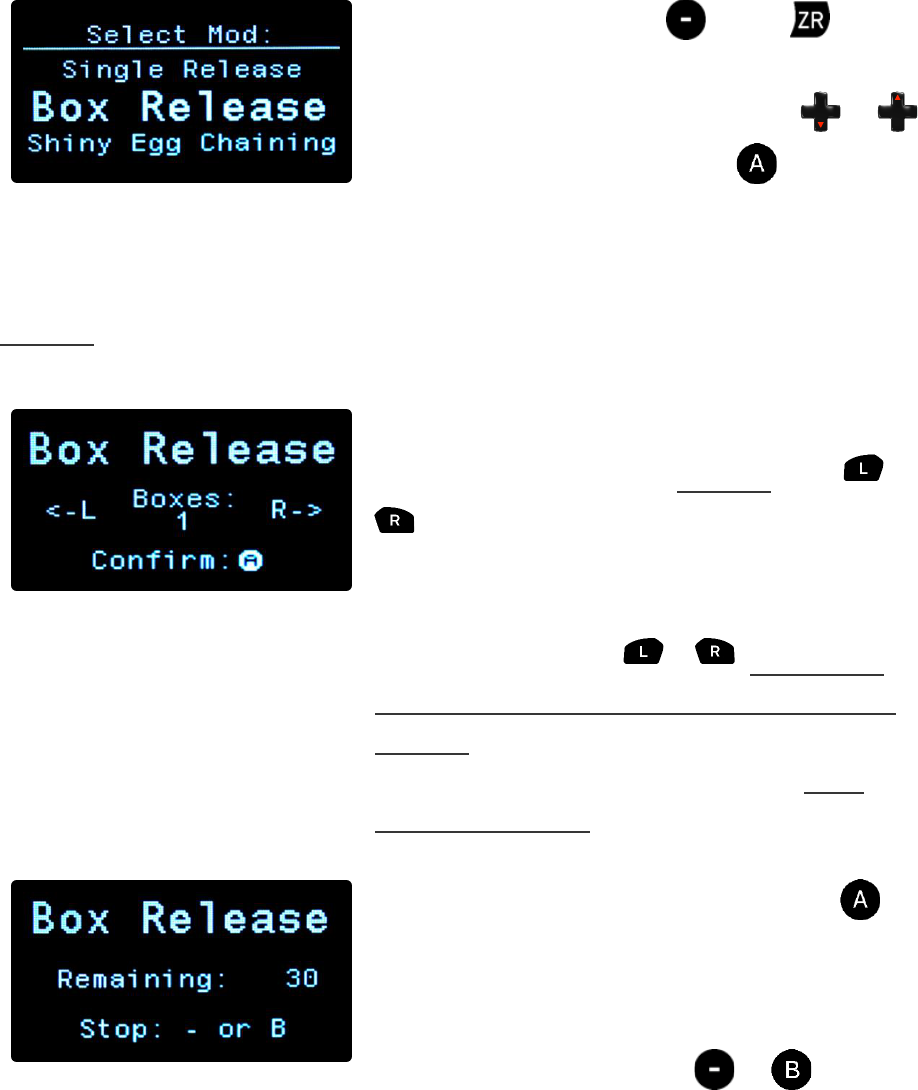
STEP 5: WHILE HOLDING , HOLD until
you feel a rumble and the OLED display changes
to the MOD Selector. Navigate using or
to select Box Release, then TAP to activate
the MOD. Your controller will start to
continuously rumble.
DO NOT turn off or change the input of your TV/Monitor, this will throw off the
releasing!
STEP 6: If you only want to release one box,
just go straight to STEP 7. DO NOT press or
.
If you want to release multiple boxes, you can
navigate through any additional boxes that you
want to release using & (REMEMBER
THAT EVERY BOX MUST BE COMPLETELY FULL).
DO NOT navigate past any boxes that contain
Pokémon™ that you want to keep, or THEY
WILL BE RELEASED!
STEP 7: Now when you press confirm or ,
the MOD will begin releasing all Pokémon™ in
those boxes, and the rumbling will stop. If you
decide to change your mind midway through
releasing a Pokémon™, TAP or to stop
the MOD (Light Rumble).
Pg. 12/36
SHINY EGG CHAINING
When the Shiny Egg Chaining MOD is active, it will chain for eggs for as long as
possible, from the “Bridge Field” Pokémon™ Nursery in the Wild Area.
Gamepack Setup ★ Pokémon Sword & Shield [PRO] ★ Cronus Zen ☯ - https://youtu.be/RiMswFBSpao
This MOD will automatically change the following in-game Options:
Text Speed: Fast
Send to Boxes: Manual
Give Nicknames: Don't Give
Casual Controls: Off
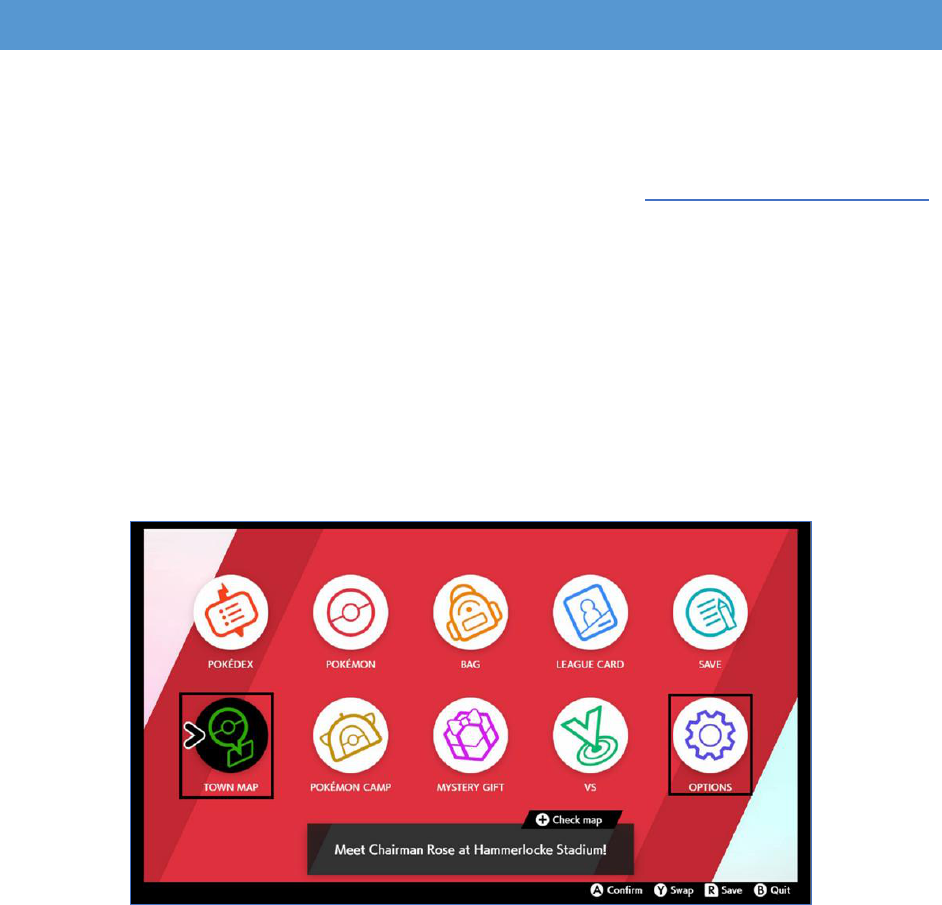
STEP 1: From the pause screen, ensure that:
“TOWN MAP” is in the Bottom Left.
“OPTIONS” is in the Bottom Right.
STEP 2: You MUST have unlocked the Rotom Bike.
Pg. 13/36
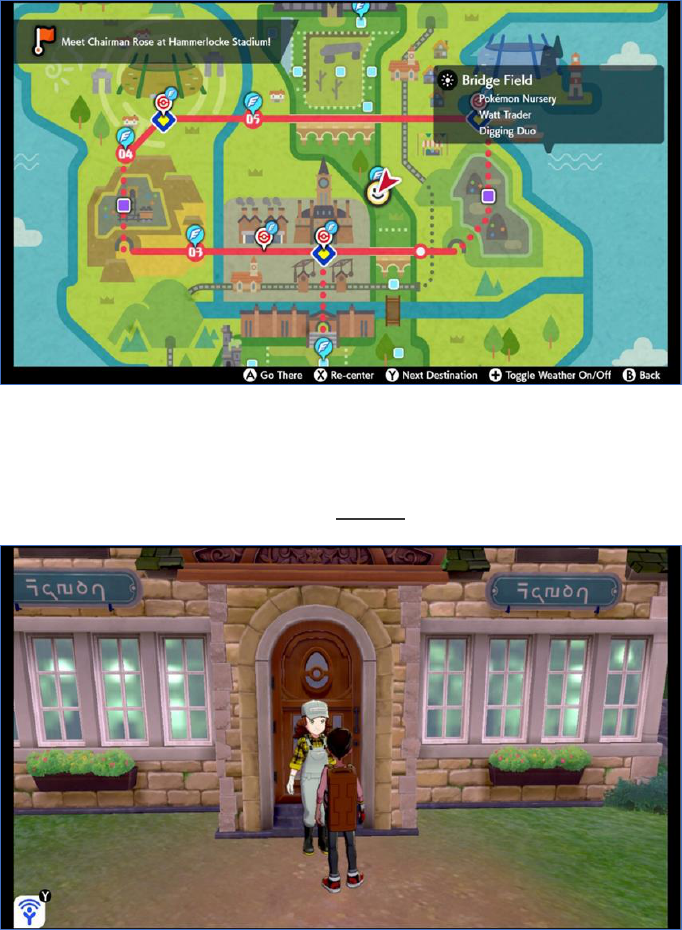
STEP 3: Take a Flying taxi to “Bridge Field”.
STEP 4: Make sure that you have setup the Pokémon™ Nursery to make Eggs.
Both Pokémon™ need to be in the Same Egg Group or use any Pokémon™ and a
Ditto. The first Pokémon™ in your party MUST be a Pokémon™, not an Egg.
STEP 5: The first Pokémon™ in your party MUST have the ability “Flame Body” or
“Steam Engine”, halving the Egg hatching time.
It is recommended to: Receive the Oval Charm, increasing the chance of Eggs
being found at the Nursery (This does not affect hatch time). Set the first
Pokémon™ in the Nursery to a local one and the other to a Foreign Pokémon™,
increasing the Shiny chance (Masuda Method). Receive the Shiny Charm,
increasing Shiny chance.
Pg. 14/36
NOTE: If you are planning to turn off your TV/Monitor, do so now; otherwise,
the HDMI handshake will interrupt the MOD. Before turning your TV/Monitor
back on, stop the MOD.
STEP 6: Make sure that you are off your bike.
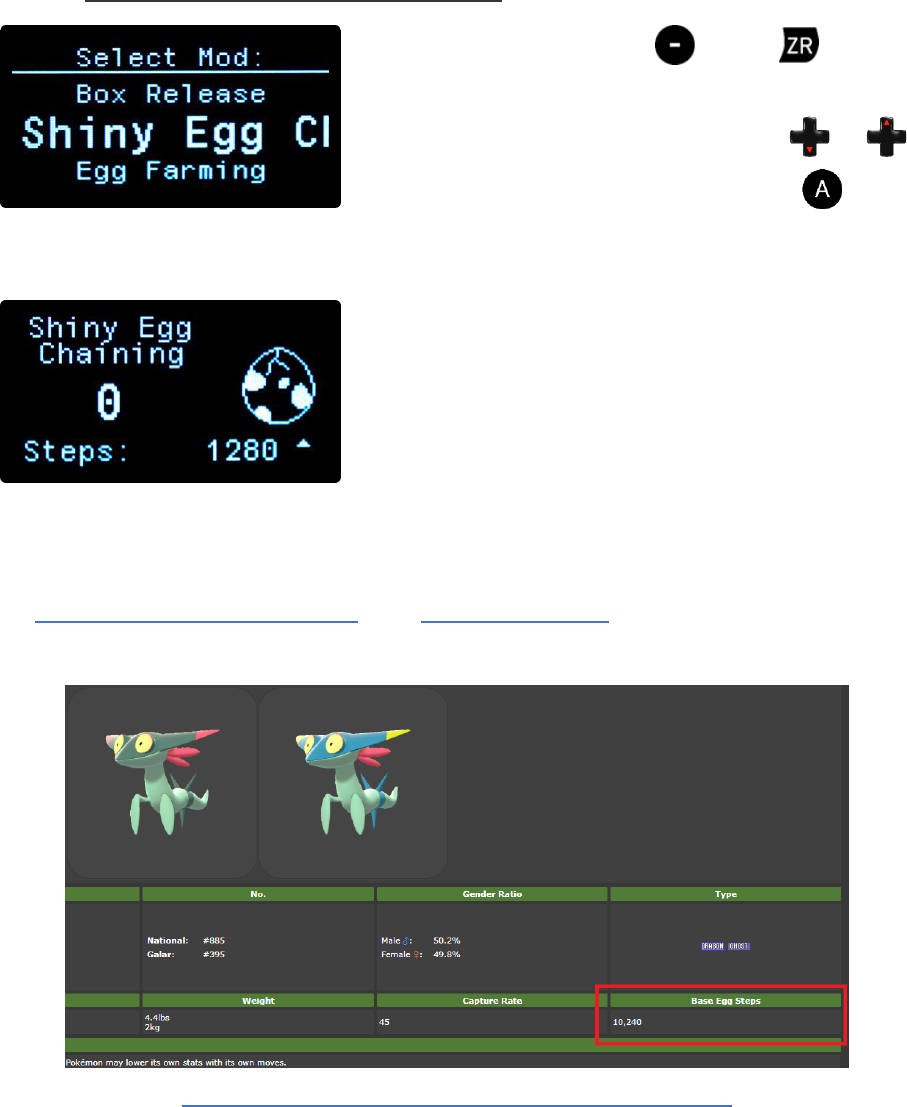
STEP 7: WHILE HOLDING , HOLD until
you feel a rumble and the OLED display changes
to the MOD Selector. Navigate using or
to select Shiny Egg Chaining, then TAP to
activate the MOD (Heavy Rumble).
The OLED will display a screen with an
animation showing that the MOD is activated.
STEP 8: The amount of time it takes to hatch eggs is different depending on
which Pokémon you are hatching. You can find info on every Pokémon on sites
like bulbapedia.bulbagarden.net, and www.serebii.net. For example, Dreepy’s
Hatch Time is 10,240:
https://www.serebii.net/pokedex-swsh/dreepy/

Pg. 15/36
This MOD has been optimized to hatch eggs efficiently based on a Pokémon’s
Hatch Steps with a Flame Body/Steam Engine Pokémon in your Party. You MUST
setup the proper timing for the Pokémon you are trying to hatch. You can search
for the Pokémon individually, or check this list (Look in the ‘Gen VII’ Column):
https://bulbapedia.bulbagarden.net/wiki/List_of_Pokémon_by_base_Egg_cycles
There are 8 different Hatch Timings to choose from:
• The current setting for Steps is
displayed on the OLED.
• TAP to increase the hatch timing.
• TAP to decrease the hatch timing.
NOTE: To deactivate Shiny Egg Chaining, TAP or (Light Rumble). While
hatching eggs you may stand still for a while; this is intended to ensure everything
stays in sync.

Pg. 16/36
EGG FARMING (ADVANCED SHINY CHAINING)
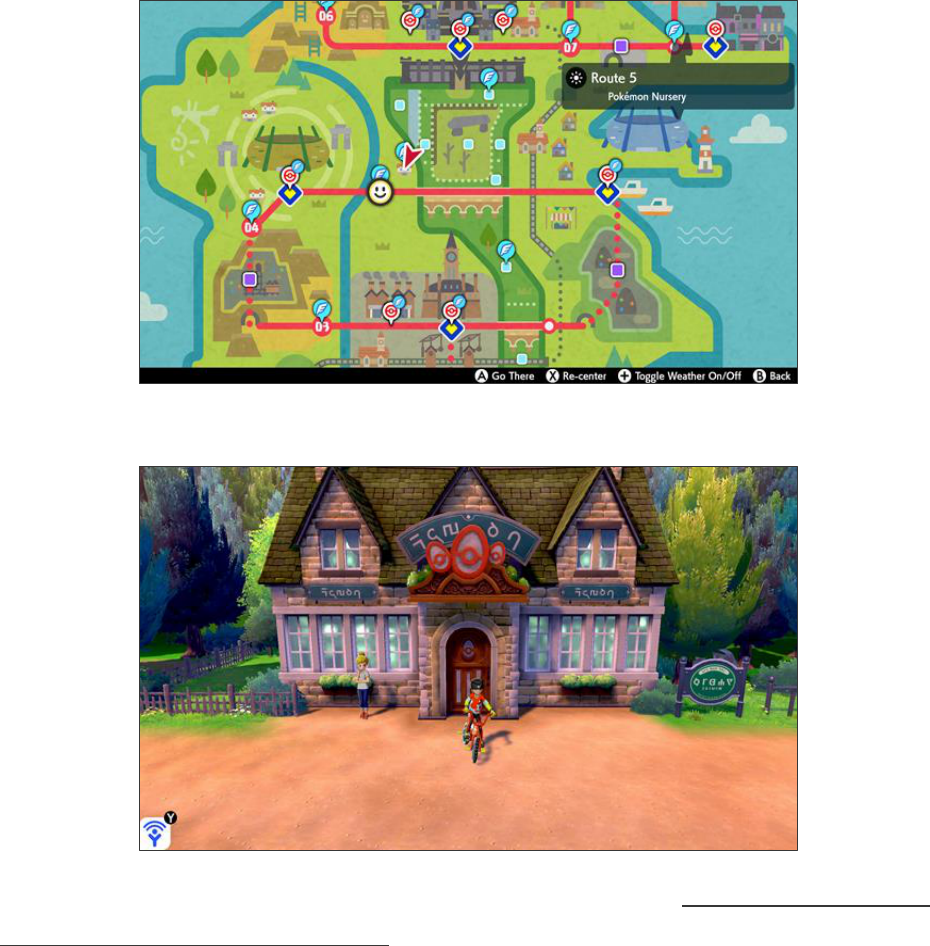
This MOD will continuously receive Eggs from the Route 5 Nursery. It is the first
part of the Advanced Shiny Chaining process.
Advanced Shiny Chaining (Egg Farming/Hatching) ★ Pokémon Sword & Shield [PRO] ★ Cronus Zen ☯ -
https://youtu.be/45GsVyglP48
This MOD will automatically change the following in-game Options:
Text Speed: Fast
Send to Boxes: Automatic
Give Nicknames: Don't Give
Casual Controls: Off
STEP 1: From the pause screen, ensure that:
“TOWN MAP” is in the Bottom Left.
“OPTIONS” is in the Bottom Right.
STEP 2: Both Flying Taxi Locations on Route 5 MUST be unlocked (The Camp Site
and the Nursery). You MUST have unlocked the Rotom Bike.
Pg. 17/36
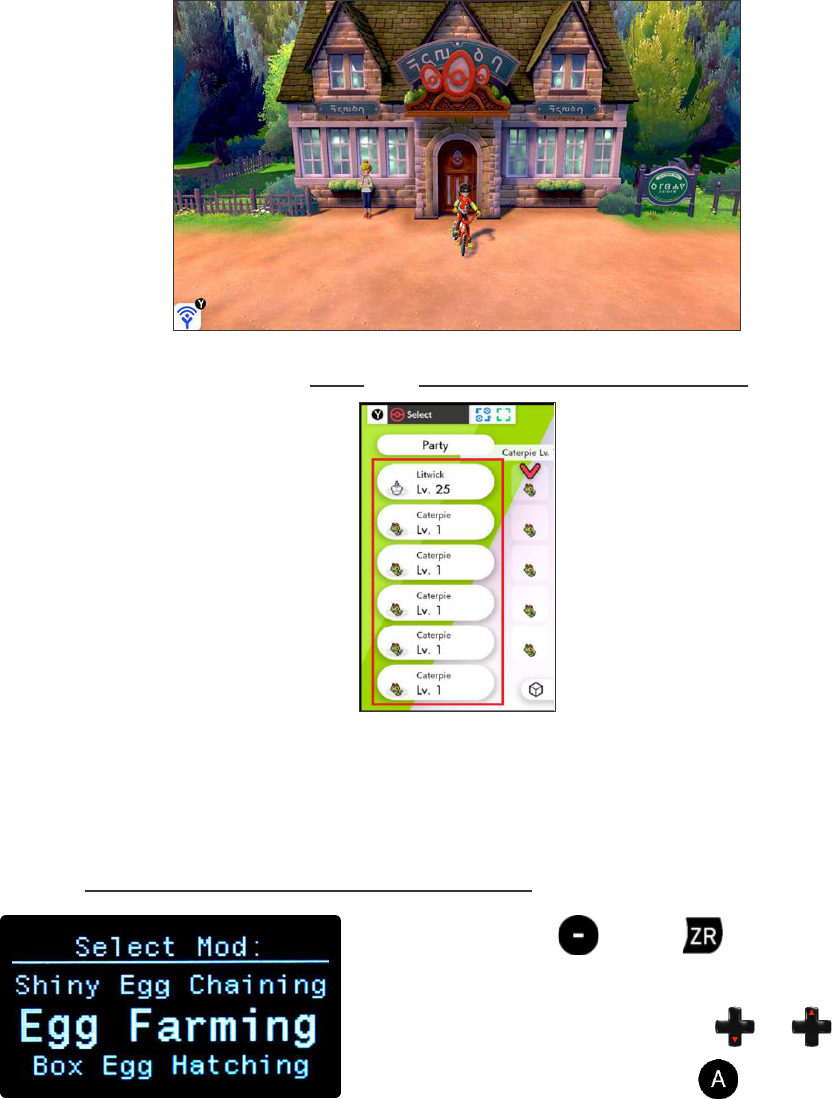
STEP 3: Travel to the Route 5 Nursery and set it up so the Lady there will have
eggs available for you to receive.
STEP 4: Your Party must be FULL and CANNOT INCLUDE ANY EGGS.
NOTE: If you are planning to turn off your TV/Monitor, do so now; otherwise,
the HDMI handshake will interrupt the MOD. Before turning your TV/Monitor
back on, stop the MOD.
STEP 5: Close out of any in-game menu screens.
WHILE HOLDING , HOLD until you feel a
rumble and the OLED display changes to the
MOD Selector. Navigate using or to
select Egg Farming, then TAP to activate the
MOD (Heavy Rumble).
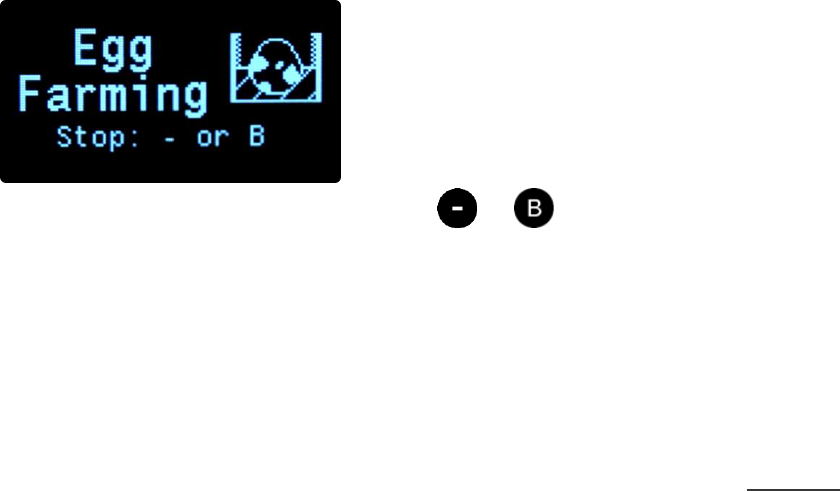
Pg. 18/36
The OLED will display a screen with an
animation showing that the MOD is activated.
NOTE: To deactivate Egg Farming, TAP or (Light Rumble).
OTHER NOTES: To increase your chances of receiving an egg from the Nursery
Lady, you should have the Oval charm and both Pokémon™ in the Nursery should
be the same species. See the Shiny egg chaining MOD for more information on
improving your Shiny chances.
It is important to note that the eggs that you receive from the Nursery are locked
into being either Shiny or Non-Shiny as soon as you receive them. DO NOT hatch
a box of eggs, reset the game, and then hatch the same box again; this will not
work, and it will waste your time. Instead, hatch the eggs using the Box Egg
Hatching MOD and then Surprise Trade or Box Release them away.
Pg. 19/36
BOX EGG HATCHING (ADVANCED SHINY CHAINING)
This MOD will hatch boxes of eggs at the Route 5 Nursery. It is the second part
of the Advanced Shiny Chaining process.
Advanced Shiny Chaining (Egg Farming/Hatching) ★ Pokémon Sword & Shield [PRO] ★ Cronus Zen ☯ -
https://youtu.be/45GsVyglP48
This MOD will automatically change the following in-game Options:
Text Speed: Fast
Give Nicknames: Don't Give
Casual Controls: Off
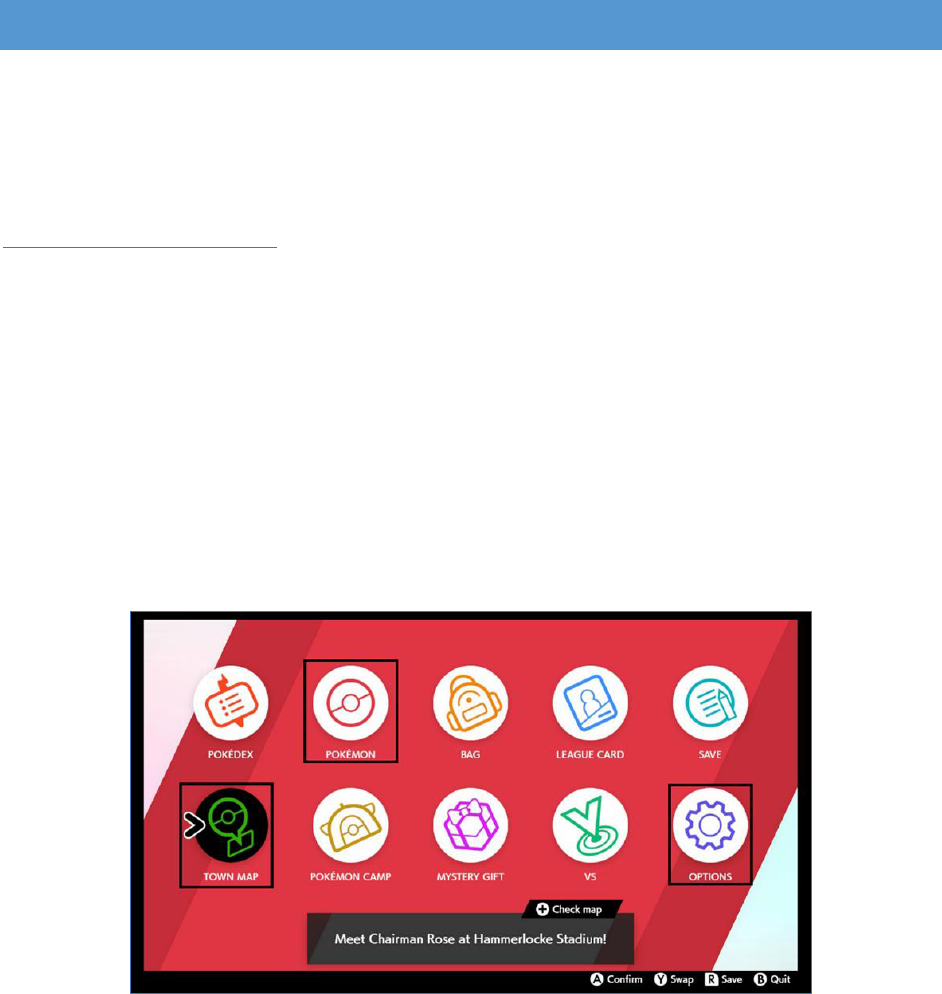
STEP 1: From the pause screen, ensure that:
“POKÉMON” is the second from the Top Left
“TOWN MAP” is in the Bottom Left.
“OPTIONS” is in the Bottom Right.
Pg. 20/36
STEP 2: Both Flying Taxi Locations on Route 5 MUST be unlocked (The Camp Site
and the Nursery). You MUST have unlocked the Rotom Bike.
STEP 3: Travel to the Route 5 Nursery.
STEP 4: Go to your Box screen and navigate to a box that is COMPLETELY FULL OF
EGGS THAT YOU WANT TO HATCH.
Pg. 21/36
STEP 5: Make sure that in your game:
1. Selection Mode is set to "Select".
2. Box View is set to "Sort Pokémon™".
3. Your Party is empty except for ONE Pokémon™. It MUST have either the
Flame Body or Steam Engine Ability.
STEP 6: WHILE HOLDING , HOLD until
you feel a rumble and the OLED display changes
to the MOD Selector. Navigate using or
to select Box Egg Hatching, then TAP to
activate the MOD. Your controller will start to
continuously rumble.

Pg. 22/36
STEP 7: Navigate through the number of boxes
that you want to hatch using &
(REMEMBER THAT EVERY BOX MUST BE
COMPLETELY FULL OF EGGS).
NOTE: If you are planning to turn off your TV/Monitor, do so now; otherwise,
the HDMI handshake will interrupt the MOD. Before turning your TV/Monitor
back on, stop the MOD.
STEP 8: TAP to confirm; the rumbling will
stop, and the MOD will be activated. You will
see an animation on the OLED letting you know
the MOD is running.
STEP 9: The amount of time it takes to hatch eggs is different depending on
which Pokémon you are hatching. See the Shiny Egg Chaining section for more
information.
There are 8 different Hatch Timings to choose from:
• The current setting for Steps is
displayed on the OLED.
• TAP to increase the hatch timing.
• TAP to decrease the hatch timing.
NOTE: Box Egg Hatching will deactivate on its own when it finishes hatching the
eggs; however, you can TAP or to deactivate it early (Light Rumble).
While hatching eggs you may stand still for a while; this is intended to ensure
everything stays in sync.
Pg. 23/36
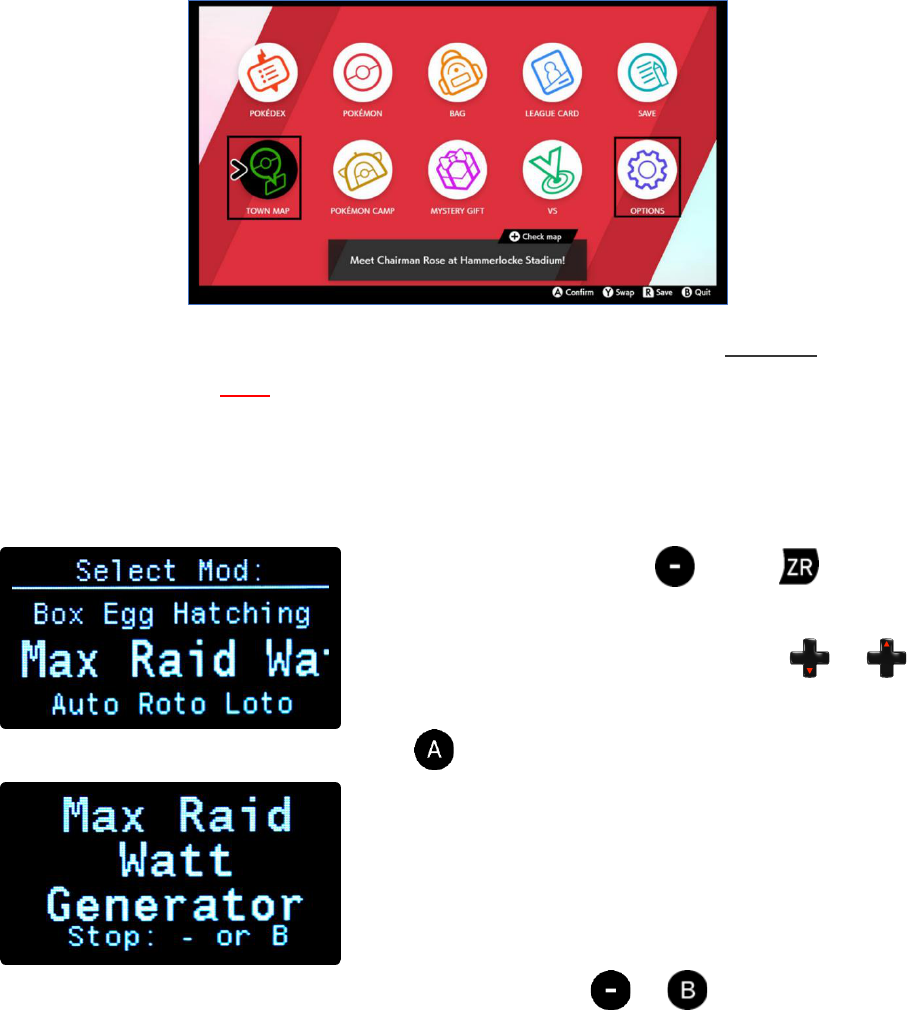
MAX RAID WATT GENERATOR
When the Max Raid Watt Generator MOD is active, it will generate a massive
amount of Watts for as long as possible. It can do this from any Den that you
have used a Wishing piece on. It will generate even more Watts if you have
already beaten the game.
Gamepack Setup ★ Pokémon Sword & Shield [PRO] ★ Cronus Zen ☯ - https://youtu.be/RiMswFBSpao
This MOD will automatically change the following in-game Options:
Text Speed: Fast
Casual Controls: Off
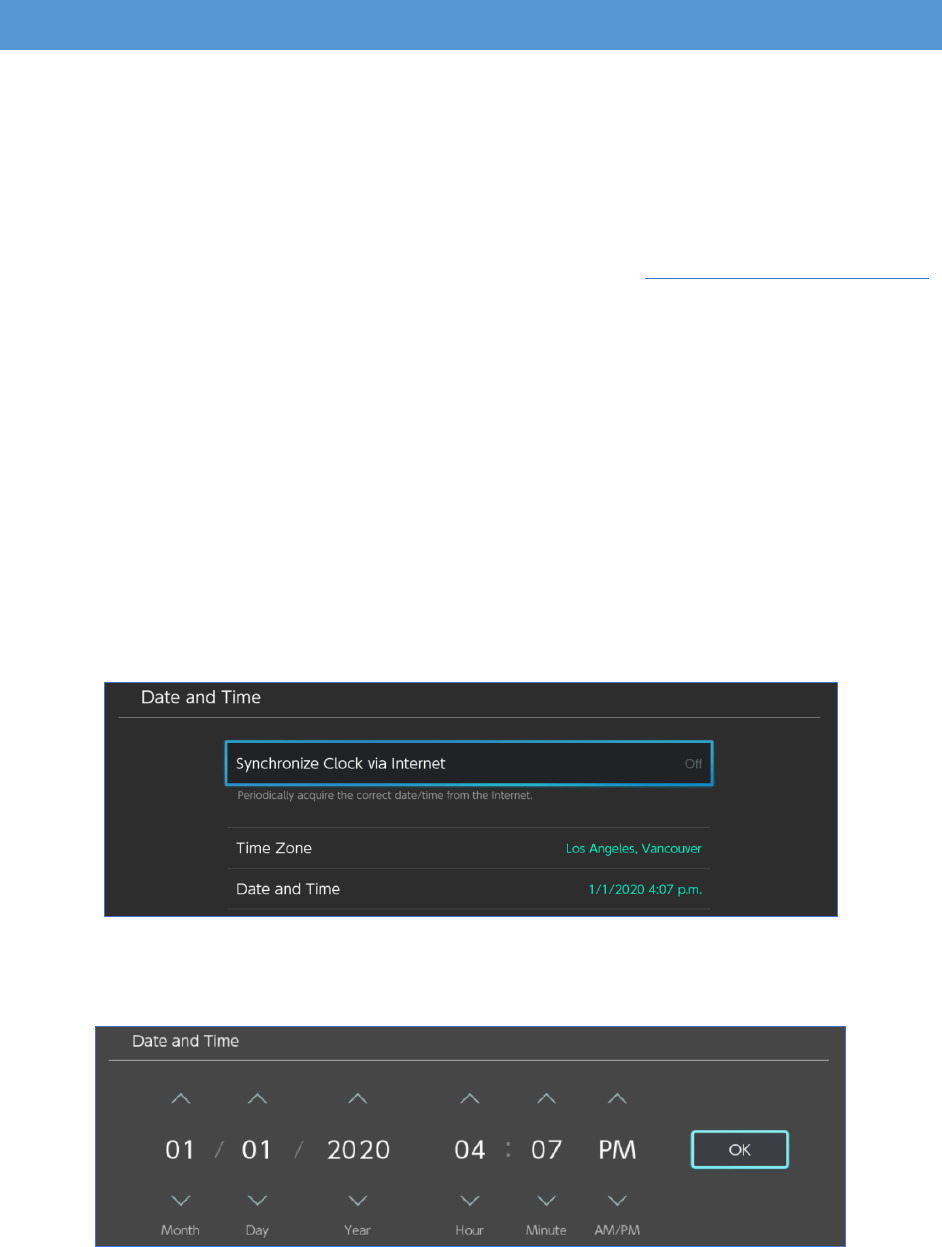
This MOD will repeatedly change your console’s date and time setting! You will
need to set it back to the accurate setting when you are finished using the MOD.
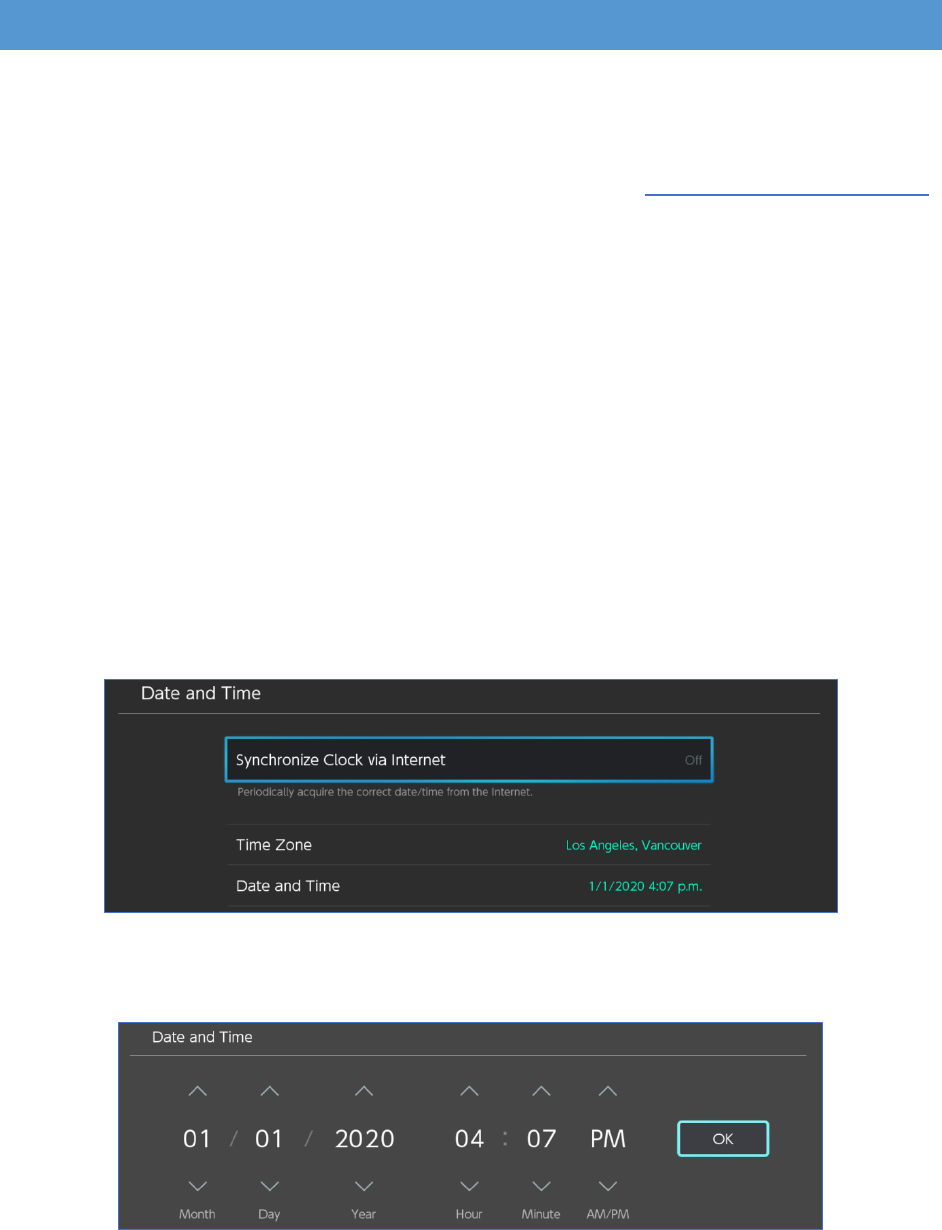
STEP 1: Go to your console’s “System Settings”, then “System” and set “Region”
to “The Americas” or any region that has a date format of “Month / Day / Year”
Now go to the "Date and Time" settings and change the following settings:
Synchronize Clock via Internet: Off.
Date and Time to January 1st of whatever the next year is (If the year is 2020, set
Jan 1st 2021, etc). If your birthday is in January, use March 1st instead!
Pg. 24/36
STEP 2: From the pause screen, ensure that "OPTIONS" is in the Bottom Right.
Then check that you are in “Local Communication Mode” to avoid other players.
STEP 3: Use a Wishing Piece in a Den and stand in front of it but DO NOT interact
with it. (Ensure it is NOT an Event Raid, as it can cause issues with the MOD).
NOTE: If you are planning to turn off your TV/Monitor, do so now; otherwise,
the HDMI handshake will interrupt the MOD. Before turning your TV/Monitor
back on, stop the MOD.
STEP 4: WHILE HOLDING , HOLD until
you feel a rumble and the OLED display changes
to the MOD Selector. Navigate using or
to select Max Raid Watt Generator, then
TAP to activate the MOD (Heavy Rumble).
The OLED will display a screen showing that the
MOD is activated.
NOTE: To deactivate Max Raid Watt Generator, TAP or (Light Rumble).
OTHER NOTES:
• If the MOD initially gets stuck in “Switch Pokémon”, you will need to
increase the Load Time Adjustable. See the Game Pack Setup here.
• Remember to fix your Date and Time settings when you are done.
Pg. 25/36
AUTO ROTO LOTO
This MOD will continuously use the Loto-ID at the “Motostoke” PokéCenter™ to
earn Master Balls, Rare Candies, PP Max, PP Up, and Moo Moo Milk.
Gamepack Setup ★ Pokémon Sword & Shield [PRO] ★ Cronus Zen ☯ - https://youtu.be/RiMswFBSpao
This MOD will automatically change the following in-game Options:
Text Speed: Fast
Casual Controls: Off
This MOD will repeatedly change your console's date and time setting! You will
need to set it back to the accurate setting when you are finished using the MOD.
WARNING: The method used by this MOD could potentially be patched out by
the game developers in the future, rendering this MOD non-functional.
STEP 1: Go to your console’s “System Settings”, then “System” and set “Region”
to “The Americas” or any region that has a date format of “Month / Day / Year”
Now go to the "Date and Time" settings and change the following settings:
Synchronize Clock via Internet: Off.
Date and Time to January 1st of whatever the next year is (If the year is 2020, set
Jan 1st 2021, etc). If your birthday is in January, use March 1st instead!
Pg. 26/36
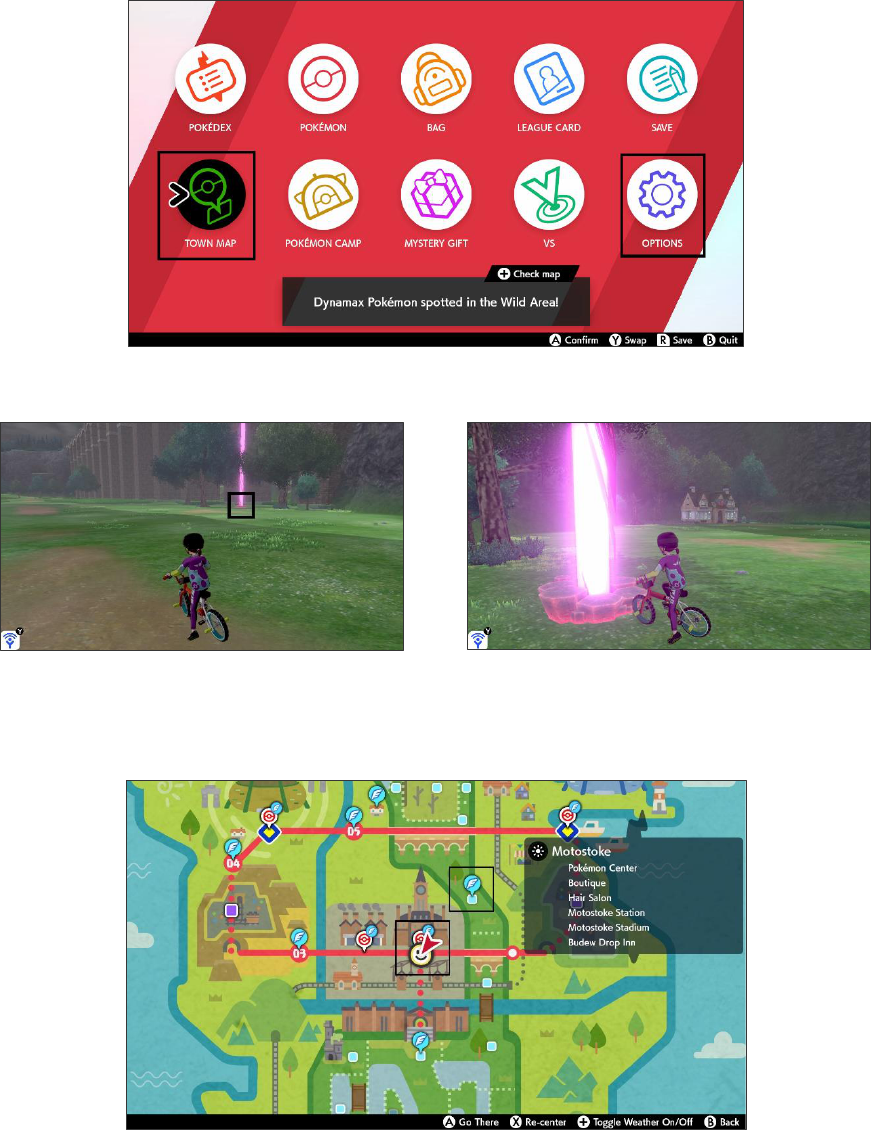
STEP 2: From the pause screen, ensure that:
"TOWN MAP" is in the Bottom Left.
"OPTIONS" is in the Bottom Right.
STEP 3: You MUST use a Wishing Piece on the den near the Bridge Field Nursery.
STEP 4: The Flying Taxi locations in “Motostoke” and “Bridge Field” MUST be
unlocked. Also, you MUST have unlocked the Rotom Bike.
Pg. 27/36
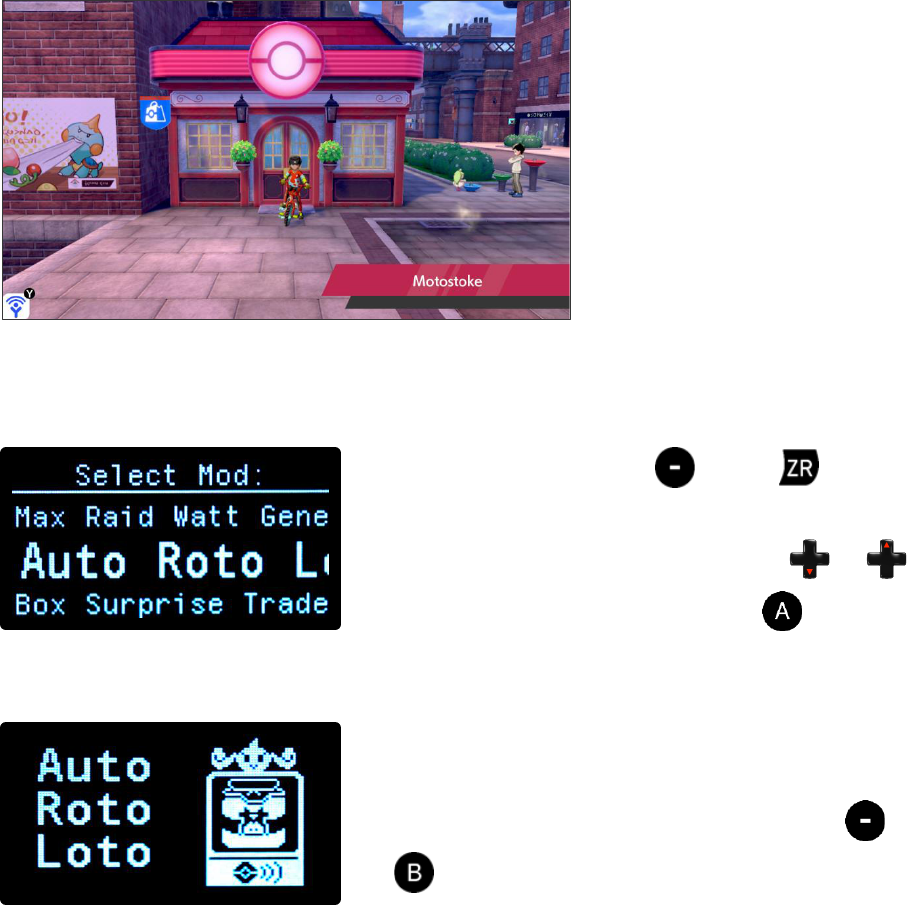
STEP 5: Travel to
Motostoke, and make sure
you are outdoors.
NOTE: If you are planning
to turn off your
TV/Monitor, do so now;
otherwise, the HDMI
handshake will interrupt
the MOD. Before turning
your TV/Monitor back on,
stop the MOD.
STEP 6: WHILE HOLDING , HOLD until
you feel a rumble and the OLED display changes
to the MOD Selector. Navigate using or
to select Auto Roto Loto, then TAP to
activate the MOD (Heavy Rumble).
The OLED will display a screen with an
animation showing that the MOD is activated.
NOTE: To deactivate Auto Roto Loto, TAP
or (Light Rumble).
OTHER NOTES: To get increased odds of receiving rare items you can use the Box
Surprise Trade MOD to fill up your Boxes with as many Pokémon from other trainers as
possible. The more you have the better the odds.
This only counts for the current Pokémon™ in your Boxes; if you release all your surprise
traded Pokémon™, you will no longer have increased odds. You may want to trade a
bunch of them to your Pokémon™ Home so you can switch them out whenever you plan
to use this MOD.
Event Raids can cause issues for the MOD. When you run into an Event Raid, finish the
raid first, then use another Wishing Piece.
Pg. 28/36
BOX SURPRISE TRADE
This MOD will automatically Surprise Trade entire boxes of Pokémon™.
Nintendo™ Online and a stable internet connection is REQUIRED.
Gamepack Setup ★ Pokémon Sword & Shield [PRO] ★ Cronus Zen ☯ - https://youtu.be/RiMswFBSpao
This MOD will automatically change the following in-game Options:
Text Speed: Fast
Casual Controls: Off
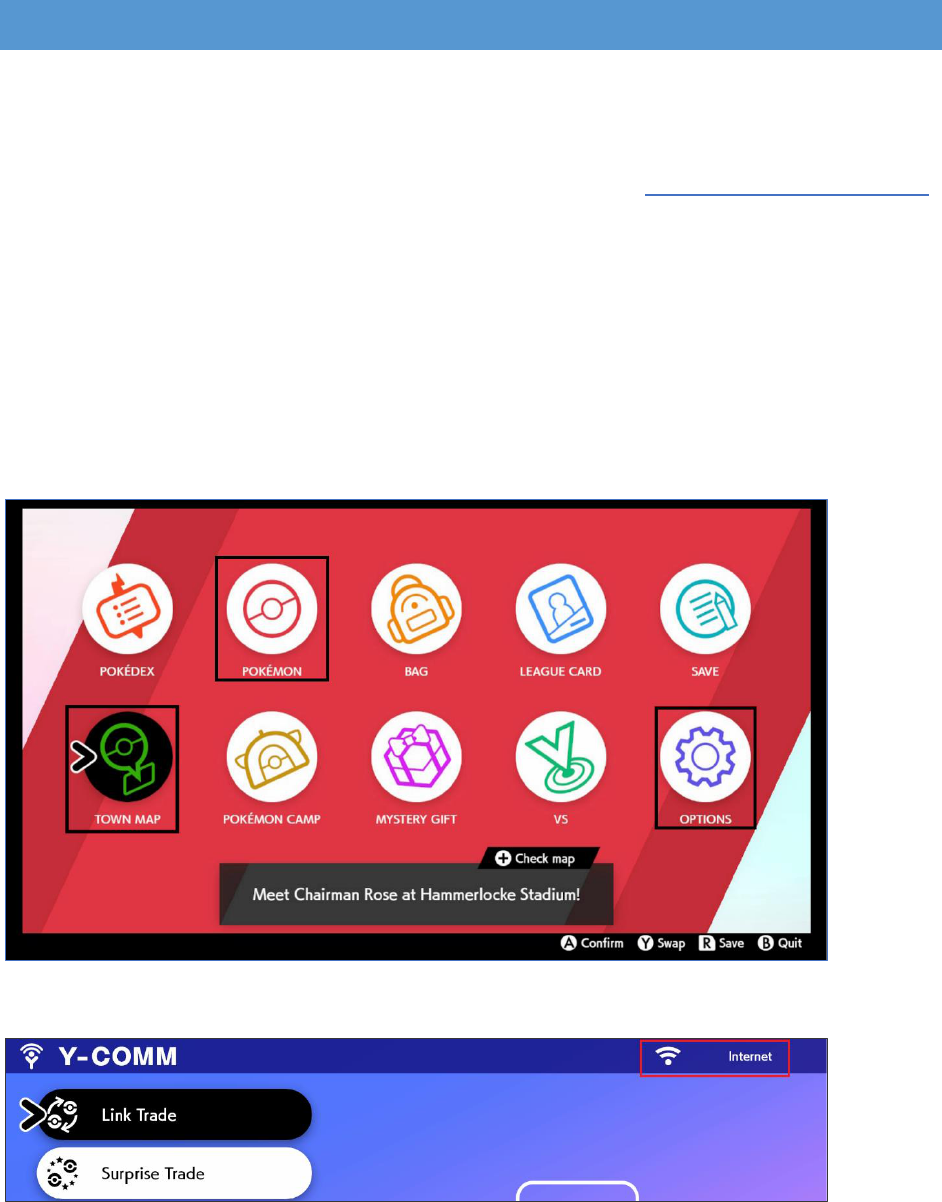
STEP 1: From the pause screen, ensure that:
“POKÉMON” is the second from the Top Left
"TOWN MAP" is in the Bottom Left.
"OPTIONS" is in the Bottom Right.
STEP 2: Open Y-COMM and set your communication mode to Internet.

Pg. 29/36
STEP 3: WARNING: DO NOT have any Pokémon™ that you want to keep in the
boxes you select, or they will be surprise traded!
STEP 4: Go to your Box screen and navigate to a box that is FULL OF POKEMON™
(NO EGGS) THAT YOU WANT TO SURPRISE TRADE.
NOTE: If you are planning to
turn off your TV/Monitor, do
so now; otherwise, the HDMI
handshake will interrupt the
MOD. Before turning your
TV/Monitor back on, stop
the MOD.
STEP 5: WHILE HOLDING , HOLD until
you feel a rumble and the OLED display changes
to the MOD Selector. Navigate using or
to select Box Surprise Trade, then TAP to
activate the MOD. Your controller will start to
continuously rumble.
STEP 6: Navigate through any additional boxes
that you want to surprise trade using &
(XB: LB & RB / PS: L1 & R1) (REMEMBER
THAT EVERY BOX MUST BE COMPLETELY FULL).
DO NOT navigate past any boxes that contain
Pokémon™ that you want to keep, or THEY
WILL BE SURPRISE TRADED! If you only want to
surprise trade one box, do not tap the bumpers.

Pg. 30/36
STEP 7: Now when you TAP confirm the
MOD will begin surprise trading all Pokémon™
in those boxes, and the rumbling will stop. To
stop surprise trading at any time, TAP or
(Light Rumble).
Pg. 31/36
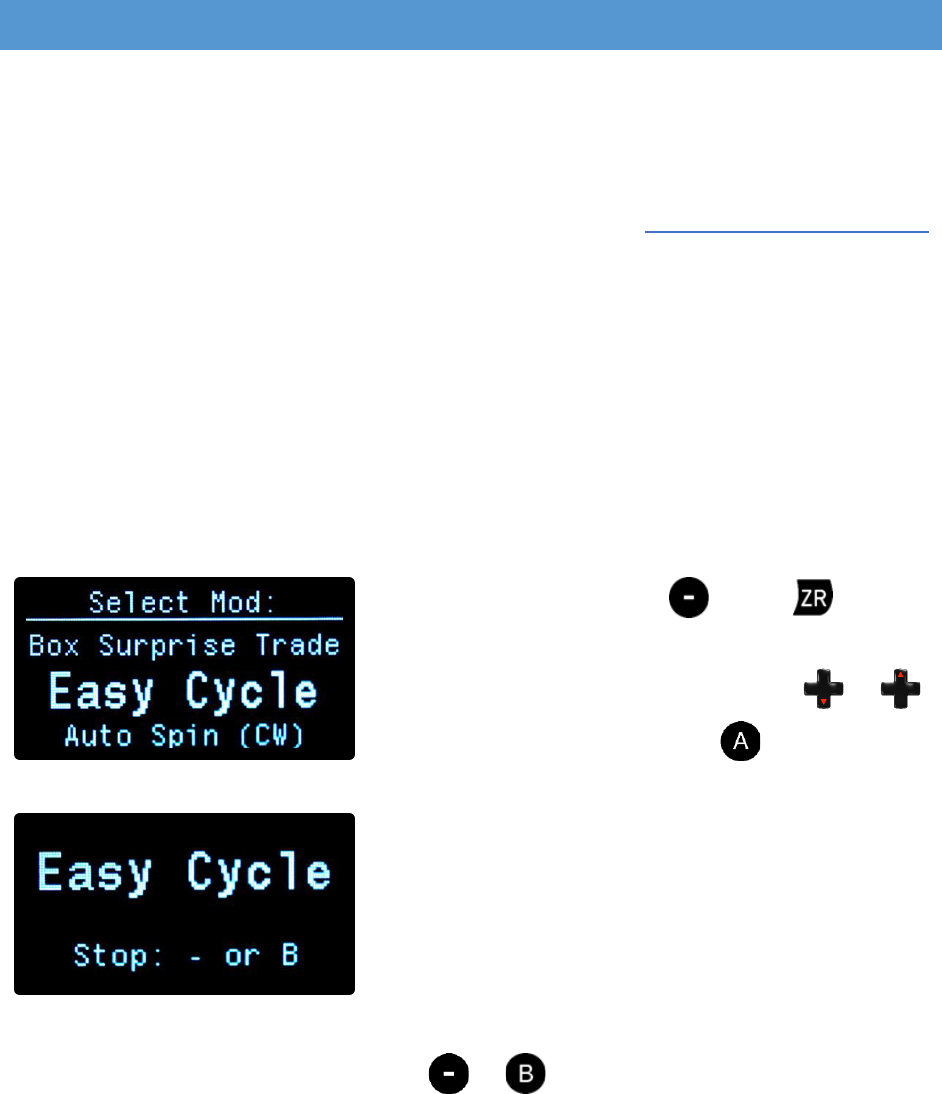
EASY CYCLE
This MOD is to be used outside of the Wild Area and will continue to bike in
circles until it is stopped. This can be useful for both hatching eggs, gaining
friendship using the Soothe Bell, and more!
Gamepack Setup ★ Pokémon Sword & Shield [PRO] ★ Cronus Zen ☯ - https://youtu.be/RiMswFBSpao
STEP 1: Start by getting on the Rotom Bike in a safe location, away from any
Pokémon™ encounters and with enough room to bike in circles.
NOTE: If you are planning to turn off your TV/Monitor, do so now; otherwise,
the HDMI handshake will interrupt the MOD. Before turning your TV/Monitor
back on, stop the MOD.
STEP 2: WHILE HOLDING , HOLD until
you feel a rumble and the OLED display changes
to the MOD Selector. Navigate using or
to select Easy Cycle, then TAP to activate
the MOD (Heavy Rumble).
The OLED will display a screen showing that the
MOD is activated.
NOTE: To deactivate Easy Cycle, TAP or (Light Rumble).
Pg. 32/36
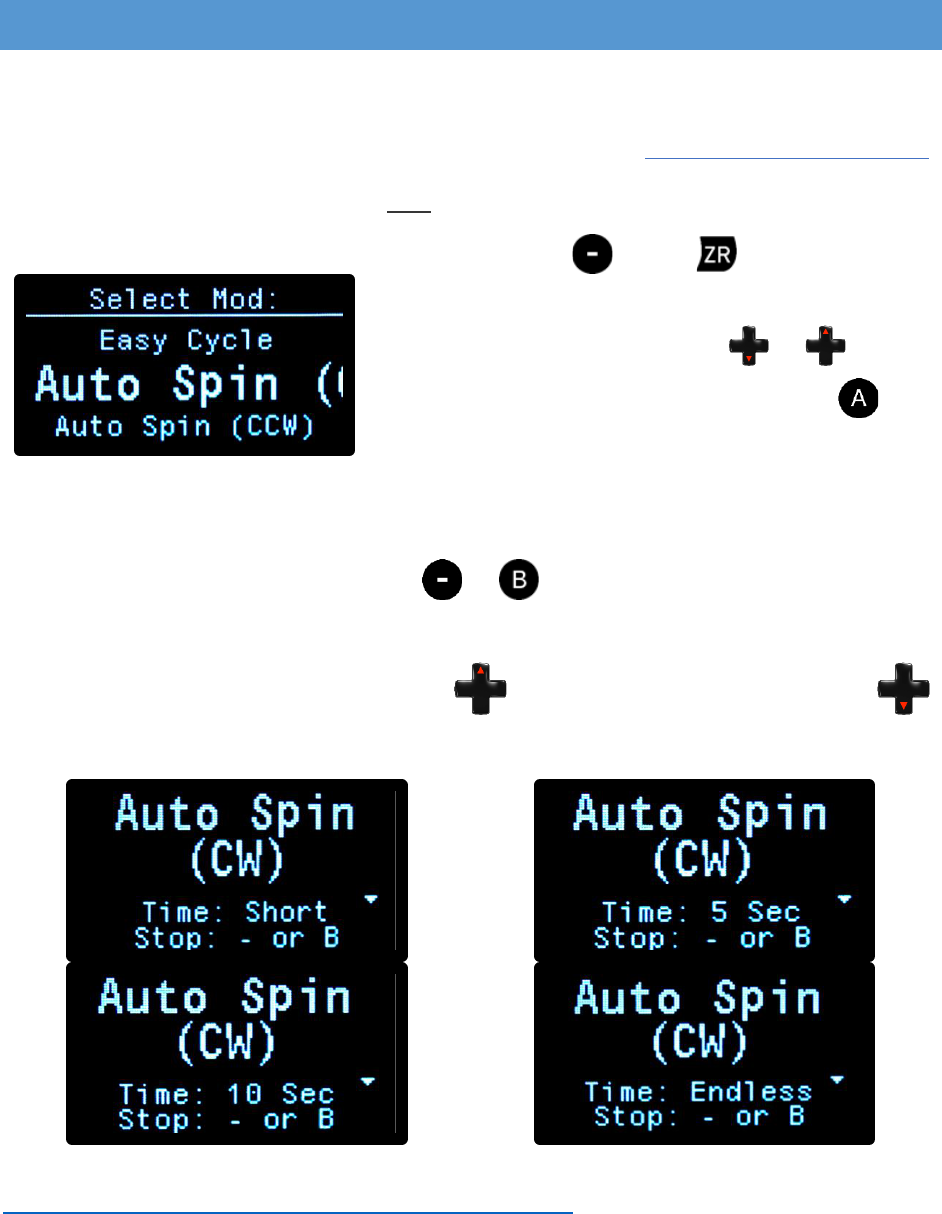
AUTO SPIN
This MOD will make your character spin, easily evolving Milcery into Alcremie.
Gamepack Setup ★ Pokémon Sword & Shield [PRO] ★ Cronus Zen ☯ - https://youtu.be/RiMswFBSpao
ACTIVATION: Make sure you are OFF your bike.
WHILE HOLDING , HOLD until you feel a
rumble and the OLED display changes to the
MOD Selector. Navigate using or to
select Auto Spin (CW or CCW), then TAP to
activate the MOD (Heavy Rumble).
Auto Spin (CW) will make you spin Clockwise.
Auto Spin (CCW) will make you spin Counterclockwise.
NOTE: To deactivate Auto Spin, TAP or (Light Rumble).
TIMING: The amount of time that you will spin can be adjusted, and will be reset
every time you activate this MOD: TAP to increase the spin time or TAP
to decrease the spin time. Spin Times (Displayed on the OLED):
You can find more information on how to evolve your Milcery online, for example:
https://www.serebii.net/pokedex-swsh/alcremie/.
Pg. 33/36
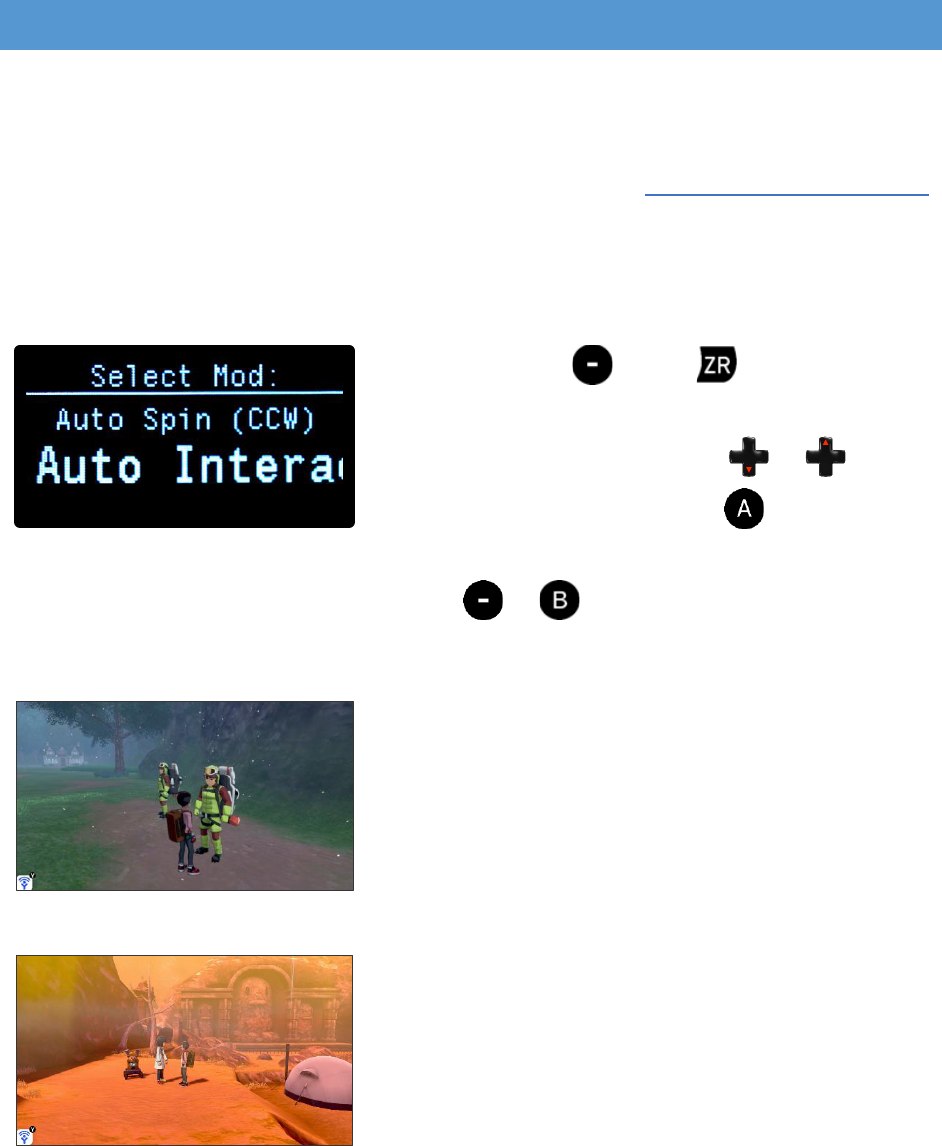
AUTO INTERACT
This MOD will quickly and continuously tap ZR (RT on XB1 or R2 on PS4). This
can be used in many different ways, see Tips & Tricks below for examples.
Gamepack Setup ★ Pokémon Sword & Shield [PRO] ★ Cronus Zen ☯ - https://youtu.be/RiMswFBSpao
NOTE: If you are planning to turn off your TV/Monitor, do so now; otherwise,
the HDMI handshake will interrupt the MOD. Before turning your TV/Monitor
back on, stop the MOD.
WHILE HOLDING , HOLD until you feel a
rumble and the OLED display changes to the
MOD Selector. Navigate using or to
select Auto Interact, then TAP to activate
the MOD (Heavy Rumble).
NOTE: To deactivate Auto Interact, TAP or (Light Rumble).
Example Uses:
Getting Fossils and other rare items from the
Digging Duo Brothers in Bridge Field.
Creating Fossil Pokémon™ from Cara Liss, on
Route 6.
If you are Shiny Chaining for Fossil Pokémon, it
is good to save before talking to her to better
utilize the fossils in your bag. You can close the
game without saving and try to create the same
batch of Fossil Pokémon™. Check each of the
created Pokémon™ and close your game if you
did not get a Shiny.
Pg. 34/36
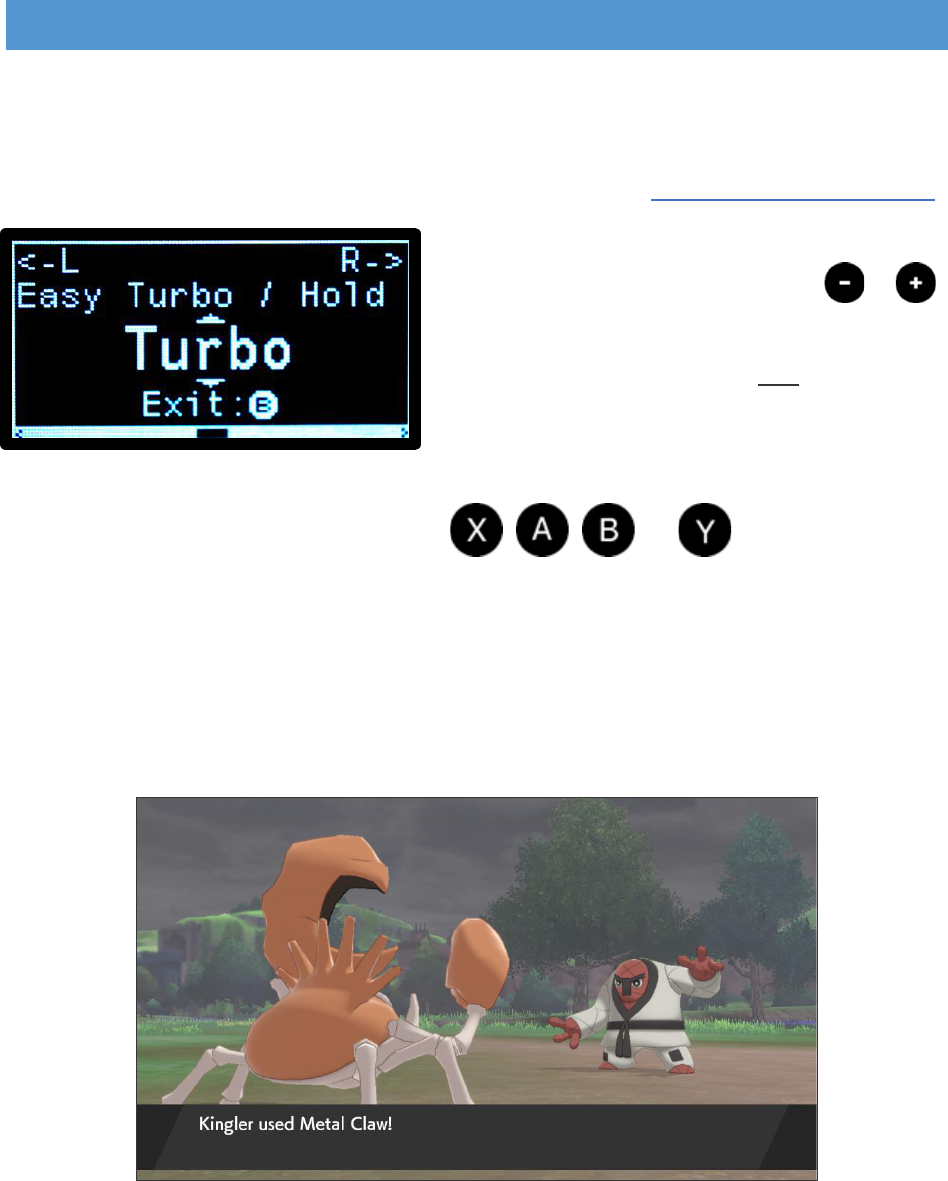
EASY TURBO / HOLD
The Easy Turbo / Hold MOD allows you to select one of three options for each
face button, to assist with various gameplay actions…
Gamepack Setup ★ Pokémon Sword & Shield [PRO] ★ Cronus Zen ☯ - https://youtu.be/RiMswFBSpao
STEP 1: Open the Game Pack Configuration
Menu on the OLED display, HOLD &
together until you feel a rumble. This menu
provides you with access to ALL adjustable
settings and MODS.
STEP 2: Navigate to Easy Turbo / Hold , , , or and select the
MOD that you wish to use.
• “Turbo” will cause the face button to be rapidly pressed while you are
holding it.
o This is especially useful for speeding through text and
Pokémon™ battles (Turbo A).
Pg. 35/36
• “Hold” will cause the face button to be held while the button is
released.
o This is useful for actions such as speeding up text (Hold B).
• “Constant Turbo” will be constantly and rapidly pressing the face
button while the button is released.
o This is useful for making fossil Pokémon™ (Constant Turbo A).